


 Steps in Order
Preparation
1. Buy or otherwise obtain a Portable Hard Drive. Make sure it is large enough to hold your library. This one is bigger than the hard-drive in my computer!
So I reckon it will work. Bought one of these at Micro Center yesterday. On SALE! Score!
Tosihiba Portable 160GB 5,400RPM USB Hard Drive
2. Set up the Drive to receive the files. I created a music folder on the drive.
3. As with any risky type of operation ~ Preparation is key ~ Backup your iTunes Library ~ First. I put mine on DVD-R's. These are whopping 4.7GB! Much larger than a CD-R.
Following this article from The Unofficial Apple Weblog ~tuaw.com, by Scott McNulty:
How To: Back up your music using iTunes 7
The backup took me about 40 - 45 minutes and used 4 DVD-R's. Relatively small library - but this will only get larger, I'm sure.
Now for the actual scary part:
Execution
Following the instructions from a lifehacker.com post: How to Move Your iTunes Library to an External Drive
1. Change your settings. First, in iTunes' Preferences panel, in the Advanced section, make sure "Copy files to iTunes Music folder when adding to library" is checked, as well as "Keep iTunes Music folder organized." Then, in the "iTunes Music folder location" area, click on the Change... button, and enter the folder on your external drive you want to move your library to.
Hint: Store your music in a subdirectory of the destination. Like, if your new spot is D:\TOSHIBA EXT\Music\ iTunes\Tom\Library\, set your music folder to D:\Music\iTunes libraries\Tom\Library\.

2. Move the music. Let iTunes do it for you. From the Advanced menu in iTunes, choose "Consolidate Library." You'll get a prompt that looks like this:
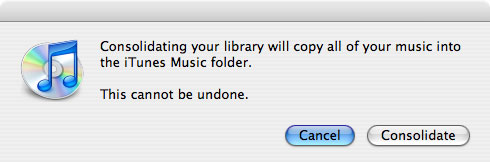
Click "Consolidate". Once done, (depending on the size of your library) this could take a while to actually do. Probably safe to get up and walk away for awhile.
Note: This step originally took about an hour and a half to two hours for my mac to complete. We had a bleepin' power belch about 8/10 of the way through the copy process that took everything down for about half a second. *sigh* It finished rather quickly after that, but when I looked at the settings I had changed in iTunes they had reverted back to the original settings. Not willing to take the chance on screwing this up. I deleted everything on the portable and started over. *heavy sigh* Thorough I am...Dammit. As I put this edit in, iTunes is about 2/3 of the way through my library.
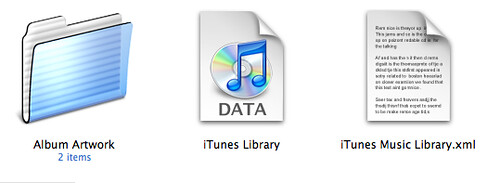
3. Move your internal iTunes Files. We are nearly finished now. The media files have been moved, now we need to move the internal database files for iTunes. This is where that handy music sub-directiry comes in. Copy the files iTunes Library, iTunes Music Library.xml and the folder, Album Artwork. Navigate to the folder above where the actual music files are. In my case: D:\TOSHIBA EXT\Music\ iTunes\Tom\
4. Point iTunes to the new library database file. There are now two copies of the library, one on your original drive, and one in the destination (portable) drive. iTunes needs to know where the new one is. If iTunes is running quit the application. Then launch iTunes, while holding down the Option key (Shift on a PC). When it starts it will ask you which library to use. Click "Choose Library" and browse to where the iTunes Library.itl on the external drive.

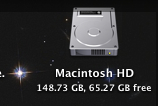
Now iTunes will use the new library location. Now I can delete the old folder and free up a bunch of space. In my case it should be 9 or 10 Gigs.
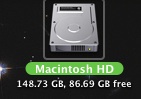
A gain of nearly 22 GB freed. Woo Hoo!
Now my iTunes library is portable(!) Bonus! The only real drawback for this is you have to have that drive connected in order to play music from iTunes...Not gonna be an issue for me...If I remember to hook it up!
To quote Gina Trapani @ Lifehacker:
"Using this method, you can plug in your external hard drive to another computer (PC if you've got iTunes on Windows, or another Mac if on the Mac) and as long as it gets assigned the same drive letter, you can access your full library, with play counts, playlists and other metadata intact from anywhere."
Good one Gina!
1 comments:
Thank you SO much for this! I did this about a month ago because I have an older laptop and I was running out of space on my laptop's hard drive. Ended up freeing about 10 GB by transferring all my songs to an external drive! Thanks again!
Post a Comment